Designing Accurate Amplifiers for Tiny Signals

Introduction

Designing instrumentation electronics for the amplification of small signals can present a number of challenges. Whether it is the electrically noisy world we live in, or our expectation that the equipment will work reliably under the bonnet of a car or in the North Pole, ‘real world’ electronic design is rarely straightforward. This blog discusses a few important design issues that impact upon the development of high quality instrumentation amplifier and signal conditioners.

Ron Joyce, Design Engineer at Mantracourt explains more.

Amplifier Design

The starting point of such an amplifier design may well be the choice of Operational Amplifier (op-amp) for the input stage. There is quite an array to choose from but choosing a device that offers a first gain stage with a low offset drift and low noise performance is crucial if the signal quality at the input stage is to be maintained.

To further ensure signal stability, the ‘gain resistors’ within the op-amp circuit should be high quality components and have a temperature coefficient of 5ppm/°C or less.

Where potentiometers are incorporated in the design to enable the amplifier to be calibrated, the range of trim they provide should be optimised for ease of calibration and to minimise the effect of their temperature coefficient which, by contrast could be 100ppm/°C or higher. There is a trade-off between allowing enough adjustment to compensate for transducer and electronic component variation and reducing the effect of the potentiometer’s relatively poor temperature stability in the signal chain. In practice the potentiometer should provide only the minimum amount of adjustment necessary to overcome the system variables, any more than this degrades the temperature performance and makes calibration difficult to set due to the excessive amount of adjustment on offer.

PCB Design

A ground plane is an important feature when designing a PCB for a small-signal amplifier. This comprises a layer of copper that serves as a low impedance return path for the currents flowing from various parts of the circuit. This helps to reduce noise and ensure that all components within a system use the same reference potential when comparing different signal voltages.

A ground plane also facilitates PCB design, the ground connection of any component can be directly routed to the ground plane by means of via holes without having to run additional tracks.

In a similar way to the ground plane, when adopting a multi-layer approach, an internal power plane can be incorporated into the PCB design. Power planes can be placed on adjacent layers to ground planes creating a large parallel plate capacitor that helps to filter the power supply.

The use of ‘guard tracks’ is recommended to reduce the effect of PCB leakage currents. The guard track surrounds a sensitive, high impedance area of the circuit (often the input pins of an op-amp) and is connected to a low impedance source at the same potential. Since there is no potential difference between the guard and the sensitive area no current flows and a barrier is formed to any leakage current across the surface of the PCB.

Every PCB design includes unintended thermocouple junctions which modify the signal voltage due to the sum of the thermoelectric voltages generated. Such junctions are formed by two dissimilar conductors for example components soldered to copper pads, wires attached to PCBs etc. To lessen the effect, temperature gradients across the PCB should be minimised with the use of heat sinks and critical components should be grouped tightly together. Even the orientation of individual components should, where practical be taken into account by ensuring that their soldered ends are perpendicular to the direction of heat flow. Any thermoelectric effect will then be cancelled out.

Another approach is to thermally isolate certain components by including routed slots or paths in the PCB. The goal is to create nearly constant temperatures in critical areas.

PCB tracks that are carrying low voltage signals should be routed with care, avoiding noise sources. Track clearances and widths should also be considered.

Finally, with regards to the PCB layout, it is important to observe good EMC procedures.

EMC and Enclosure Design

For the accurate amplification of tiny signals, stray radio frequency signals need to be eliminated. The main problem is that unscreened high-gain amplifier circuits tend to act as radio receivers, picking up the radio frequency signal on resistor legs and PCB tracks etc – then amplifying them along with the instrumentation signal. This stray RF may be generated by electric motors, transformers or even electric lights.

For this reason LC low pass filters should be included on all I/O lines and PCB tracks should be kept as short as possible. The use of surface-mount components helps in this respect.

Ideally, a fully enclosed metal enclosure should be used to house the signal conditioning module with cable entries via EMC glands. If using a plastic enclosure, then some form of internal screening should be implemented.

Naturally, all wire connections to the amplifier will need to be screened, especially on the input otherwise these wires will simply act as antennas.

Conclusion

Careful choice of components and thoughtful PCB design are the main factors to consider in the design of low noise, low signal level amplifiers. 

Written by Ron Joyce of Mantracourt

Mantracourt is a UK based company that specialises in the design and manufacture of instrumentation amplifiers, load cell signal conditioners and wireless instrumentation systems.

Download PDF

New Upgrade for T24 24 Channel Logging Software

Introducing Version 2.0.3 of the T24 logging software which has been developed and upgraded with complex mathematical functions and expression tools. 

This software works in Windows XP, Vista and Windows 7 and allows the viewing and logging of data from the T24 wireless telemetry range.

Matt Nicholas, IT & Software Engineer at Mantracourt explains more.

Whats New:

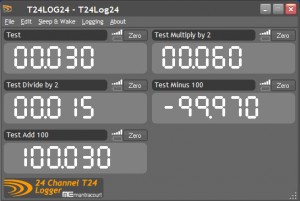
The software now lets you define what is viewed in up to 24 simulated LCD displays by entering a mathematical expression. You can now sum multiple channels, perform mathematical functions and reference other displays.

Expressions:

In versions previous to 2.0.0 one could only write a single Data Tag or, using a special function, write multiple Data Tags separated by the + sign to sum multiple Data Tag values.

Each displayed channel now supports an expression. This expression can contain references to Data Tag values, other displayed channel values and mathematical functions.

To reference a Data Tag value (That is the value delivered by a T24 module that is identified by its Data Tag) you enter the Data Tag in hexadecimal inside triangular brackets. So to refer to the data from a module with a Data Tag of FE12 you would use <FE12> in the expression.

To reference the displayed value from another channel you enter the channel number inside triangular brackets. So to refer to the value displayed in channel 1 you would use <1> in the expression.

Each displayed channel can reference any number of Data Tag values, displayed channels or fixed numbers and you can perform mathematical functions ranging from the simple to the complex.

Mathematical Operators and Functions:

<nnnn> A Data Tag must be 4 digits hexadecimal. Example <FE12>

<n> Another displayed value. Example <1>

+ Addition. Example number+number

– Subtraction. Example number-number

* Multiplication. Example number*number

/ Division. Example number/number

\ Integer division. Example number\number

^Raise to the power. Example number^number

Mod Modulus. Example MOD(number)

SQR Square root. Example SQR(number)

SIN Sine radians. Example SIN(number)

COS Cosine radians. Example COS(number)

TAN Tangent radians. Example TAN(number)

ABS Absolute. Example ABS(number)

ATN Arctangent radians. Example ATN(number)

EXP e (the base of natural logarithms) raised to a power. Example EXP(number)

FIX Returns the integer portion of a number. Example FIX(number)

INT Returns the integer value with rounding. Example INT(number)

LOG Returns the natural logarithm of a number. Example LOG(number)

PI PI=3.1415926536

() Brackets can be used to set evaluation order. Example ((<FE12> + 100)/ 20) + <FE34>

Working Examples:

To sum multiple T24 channels simple reference the required data tags and use the addition sign. <FE12>+<FE23>+<FE45>

You can use any numeric value to convert engineering units etc. For example, if you had a weight in kg and you wanted to display it in lbs you would use <FE12> * 2.20462262185

Sum of the values displayed in channels 1 to 3. <1> + <2> + <3>

The difference between two T24 channels. This shows the absolute value. ABS(<FE12> – <FE34>)

For further information on the T24 Logging Software visit our website or download the new version.

Use of barriers with Mantracourt ATEX amplifiers

An approved barrier must be used if the ALA5 or indeed any similar products are to be installed in a hazardous area (Zone 0)

The relevant parameters for the barrier are as follows:

  • Uo = 28V, Io = 100mA, Po = 0.7W, Barrier Impedance 300Ω.

These are maximum values, actual barrier parameters will vary from model to model however the barrier impedance is not permitted to change.

Two examples of suitable barriers are:

  1. MTL7706+ (passive Zener diode type with active current limit) manufactured by MTL Instruments
  2. KFD2-STC4-EX1/2 (3-way isolated type) manufactured by Pepperl and Fuchs.

The purpose of the barrier is to limit the amount of electrical energy that can be transferred into the hazardous area in the event of a fault condition thereby preventing the ignition of any flammable atmosphere that may be present.

Connection Details for the ALA5

A simple passive barrier is shown but this can be replaced by an isolated barrier such as the P+F KFD2 mentioned above. These devices prohibit ground loops which may affect measurement accuracy and stability by providing three-way isolation between power, input and output.

View the full specifications of the ALA5 ATEX load cell amplifier on our website.

Details on new resistance acquisition module

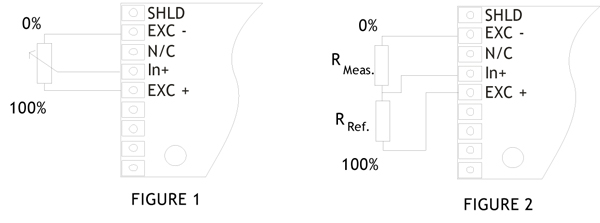
During the development of our new acquisition modules the measurement of tiny changes in resistance became key to get accurate readings and sensing small changes. In the creation of the temperature (T24-TA) and potentiometer (T24-RA) acquisition module we created two devices that sense a range of resistances. The T24-TA is designed to work with a PT100 sensor to accurately measure resistances from 20 to 250 Ohms, we provide an output in Ohms as a standard unit. The T24 wireless potentiometer acquisition module (T24-RA) is designed to measure potentiometers inputs between 500 and 100,000 Ohms. The standard wiring of the T24-RA is shown below in figure 1 connected to a potentiometer, figure 2 shows a potential divider circuit, R.ref is static known resistance and R.meas is the resistance under measurement. Using the custom calibration available in the T24-RA users can calibrate the output to whatever units they wish.

T24-RAView the full specifications of the T24-RA on our Mantracourt website.

7 things you need to know about the SGA

  1. The SGA load cell signal conditioner has a built-in Shunt Calibration function. Switch 8 of the Span switch, SW1 switches a 120k resistor in parallel with one arm of the bridge to produce a known shift in the Zero point. After calibration, switch in the Shunt Cal feature, note the change in output then switch it out. Use this figure to periodically check the integrity and calibration of the system. The PCB is configured to easily allow the Shunt Cal resistor to be changed to suit your application and load cell impedance.
  2. The Strain Gauge Amplifier can be set to provide 5V excitation as well as the normal 10V level – switch off SW4/8. As well as providing excitation for a strain gauge bridge, this can be useful for supplying power to an intelligent sensor (80mA maximum).
  3. An IS1224 module can be fitted to the SGA/D to isolate the bridge and electronics from the DC power supply. This module features a wide 9-36V power supply range making it suitable for automotive applications and other portable installations.Isolating the power supply will prevent ground loops and help minimise noise pick-up.
  4. The SGA load cell amplifier’s mA output can support both ‘sink’ and ‘source’ modes of operation. ‘Sink mode’ can control current flow either from the SGA’s own 15V supply, an external 5-50V DC supply or a suitable PLC input stage. In this mode neither output connection is common to the load cell. In ‘source mode’ the SGA load cell signal conditioner provides the current which flows through the external load to 0V. This mode has the advantage that the load cell’s  ‘EXC -‘, the SGA’s ‘Output -‘ and the power supply negative are all commoned together.
  5. The SGA has a built-in low pass filter adjustable from 1Hz to 5kHz to reduce noise or the effects of vibration in the measurements.
  6. The Strain Gauge Amplifier can support high impedance strain gauges such as pressure transducers. Its 0.1 to 30mV/V input range makes it suitable for a wide variety of applications.
  7. J2, the load cell connector provides a reference voltage of 2.5V or 5V depending on whether the excitation is set to 5V or 10V. Connect a mV source between this point and ‘+Strain Input’ to facilitate calibration from the load cell manufacturer’s published figures.

View the full specifications of the SGA on our Mantracourt website.

New Software for USB Strain Gauge/Load Cell DSCUSB

We’ve made some small changes to the software of our DSCUSB strain gauge to USB converter in response to a suggestion from one of our Partners in the USA.

Before, interested users could only view one static page of the software if the device wasn’t connected. This hid away all the helpful functions of the toolkit.

Now, even if the device isn’t connected, a DEMO mode can still be viewed so users can see all of the useful software pages such as the applying two point calibration, adjusting the measurement rates and filters, logging to .csv, and saving and restoring. This will help to show what a comprehensive device the DSCUSB can be.

Download the software to view the DEMO mode here

Wireless Telemetry Relay Module for Mains Power Switching

Capable of main power switchingT24-RM1 Wireless Telemetry Relay module offers dual 5 amp relays capable of mains power switching. These relays can be configured as high, low or window alarms to one or a sum of up to 8 x radio telemetry T24 devices. The relays can be latched and a volt free input or external command can be used to reset them. An alarm signal relay is also on board and operates if communications are lost with input devices or other selectable errors occur. This alarm relay can be silenced by a volt free input.

The T24-RM1 has many application possibilities when used as part of a system with other T24 devices from Mantracourt’s wireless telemetry range. The relay could be used to switch on a claxon siren, flashing beacon, control valve or motor.

An example case might be in the use of a crane load system where a single load cell with a wireless telemetry T24-SA Strain Acquisition Module embedded within the load cell transmits back to the T24-RM1 to warn of an approaching overload – the T24-RM1 switches a relay to sound a siren. Similarly, a warning system for a silo could be configured using 4 x wireless load cells that the T24-RM1 sums and compares to a value, which in turn switches and sounds an alarm.

The T24-RM1 could also be used for simple batch weighing systems. The weight of a vessel could be monitored using wireless load cells containing a T24-SA strain gauge to telemetry converter. When the vessels weight is under a specific value, a feeder valve should be open. Once the load in the vessel goes beyond the user limit the valve is shut and the batch is weighed.

The T24-RM1 benefits from having two relays which, if wired together appropriately, can be used to provide a windowed alarm system where the sum of up to 8 x devices can be used to sound an alarm if the total goes above or below user defined limits.

The applications for the wireless relay module are broad and multiple relays can be used to build up many controls systems. With open field wireless range of up to 200m, the T24 wireless telemetry range offers an alternative to wired systems.

Handheld Strain Gauge Indicator with RS232 Interface

Mantracourt’s PSD portable strain display or load cell indicator has been used for many years by companies worldwide as a simple wired solution for monitoring the output from load cells.

A lesser known relative is the PSD RS232 version which enables the handheld indicator to connect to any RS232 interface whether it’s a PC or simple data logger.Recording data from a load cell to RS232 via the PSD Handheld Strain Gauge Indicator

The PSD232 sends the displayed value to the RS232 port at 9600 baud in an ASCII format, terminated by a carriage return and line-feed making it suitable for stand alone data loggers, larger serial displays as well as interfacing onto a PC for logging which can provide a useful record during a calibration or load cell test.

The RS232 output is provided at the same time that the display is updated which depends on how the PSD has been set up by users. Updates rate of up 10Hz can be set.

For more information, view the specification of the PSD232 strain gauge display.

Digital Strain Gauge Conditioner (DSC) Identification Software Upgrade

Digital Strain Gauge Conditioner Utility Software

Digital Strain Gauge Conditioner Utility Software

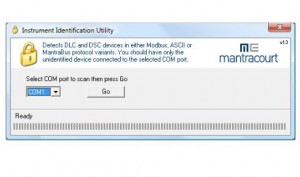
The Identification Utility software for Mantracourt’s Digital Strain Gauge Converter has undergone improvements and now offers a faster and more robust utility for DSC and DCell users.

Version 1.4 of the application will detect a DCell or DSC connected to a PC when the station number or the baudrate is unknown or has been inadvertently changed. You will need to know the protocol to save trying each type. Protocols are MantraBus, MantraASCII and ModBus.

To start using the application, download here:

http://www.mantracourt.co.uk/software/identify-unknown-dcell-or-dsc

Connecting to T24 Telemetry Modules Without Removing Power – New Feature

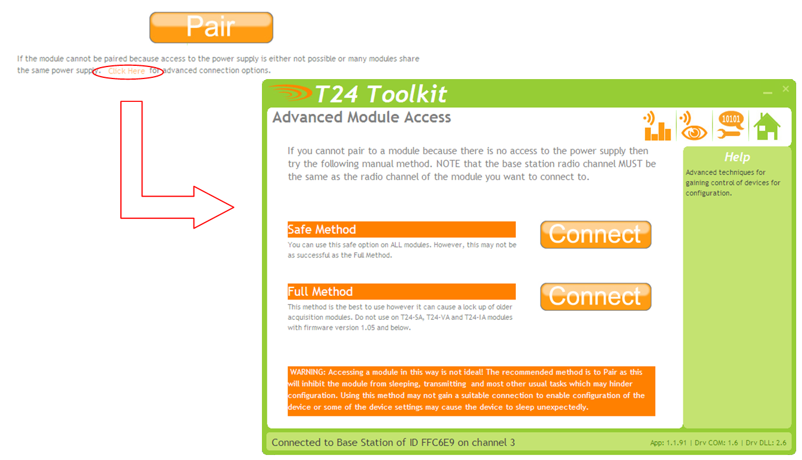
News for our T24 users. An enhanced feature has been added to Mantracourt’s T24 Toolkit to help with pairing if you’re unable to physically reach the T24 module. Previously, configuration could only happen by removing and re-applying power. Now with the new version of T24-Toolkit you can connect and configure your device wirelessly provided you know its Radio ID and Data Tag.

Take a look at the Toolkit screenshot below and you will see below the “Pair” button there is a highlighted link that can take you to the new connection functions. Follow the link to the advanced module access page where there are two options to connect:

1. Safe Mode: To be used on any firmware version of the T24-Acquisition modules, this method may not work every time as it can be influenced by large amounts of radio traffic or if the device is transmitting at a very low rate.

2. Full Mode: This method is to be used with T24 devices with firmware version 1.06 and above. The method both wakes and pauses the device simultaneously.

How to pair to your T24 telemetry acquisition without removing power

Be aware when using either of these functions it is essential that the user return to the home page of the toolkit which sets the acquisition module back into its normal running mode. If a user moves out of range of the device it could be left paused and will need to be reconnected to and reset by returning to the home page while connected. If your device is not reset after configuration, the toolkit will alert you while navigating back to the home page.

Click here to download the latest T24 Toolkit software to access the new feature.

We strongly advise that if using either of these methods that the acquisition module is tested to ensure it is working as expected afterwards.